
Thomas DeBusk, a busy attorney, recently upgraded from InerTrak to OfficeTime. While OfficeTime doesn’t have the ability to automatically import his InerTrak data, it does have a secret import function. We generally keep it on the down-low because it’s actually a feature under development. It works, but we don’t feel it has the kind of flexibility and friendliness that you should expect from OfficeTime, so we’re keeping it low profile until we can finish it. Find the secret import menu by holding down the option/alt key and choosing File->Import in OfficeTime. And if you do experiment with it, we’d love your feedback.
Remember that transferring data from any app to another is usually a finicky process, with both apps having their own idea of how data should be exported and imported. Unfortunately this is no exception. Generally, importing is about moving the columns into the right order and then making sure your data is consistent. Below is Thomas’ story of how he did it, and how (if you’re feeling brave) you can too. If you want to jump right in, skip to the end where you can see an actual sample file changed from InerTrak to ready for OfficeTime. We’re working on making this easier – but in the meantime, good luck. ~ Stephen

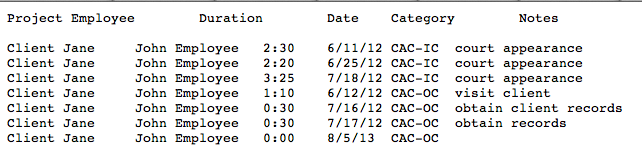
(To help get you started, here’s a sample of what the data looks like when it comes from InerTrak and how to format it for OfficeTime – You can find these two images as attachments at the end of this blog as well.)
How to Transfer Data from InerTrak to OfficeTime
Transferring data from InterTrak to OfficeTime requires managing it through three major steps:
 Export from InerTrak.
- Edit in Excel.
- Import into OfficeTime.
Step 1: Export from InerTrak.
First, export your data in tab-separated form from InerTrak. If you’re using InerTrak desktop, click on the Export tab and select the following:
Layout: Spreadsheet
Separator: Tab
You don’t need quotes around the data fields. Include whatever data you like. You probably don’t need the totals or currency symbol, but if you check every box, you just won’t use the extra information later.
Step 2: Edit in Excel.
The goal of editing your data in Excel is three-fold. First, you must make sure that each column in Excel contains data of the same kind, and only data of that kind. Secondly, you must clean up any nonconforming data, such as problematic commas and data in the wrong column. Thirdly, you must arrange the columns in the proper order.
Open Excel, and, using the Open command, open your exported, tab-separated InerTrak file. That invokes Excel’s Text Import Wizard, which asks you a series of questions about how to manage your data as you import it. You will tell it your text is delimited with tabs (not commas or semicolons or anything else). [Here is one place where you could run into trouble. For example, if you listed your clients as Last Name, First Name in InerTrak, and exported them as comma-separated text, you might wind up with the same KINDS of data in different columns, and that’s not good.]
If you’ve done the import correctly, you should wind up with columns of data from InerTrak in Excel in the following order: Client, Project, Date, Hours, Rate, Total, Billed?, Notes. Depending on what boxes you checked as you exported from InerTrak, some of these columns might be missing, but the columns you did export should be in the order listed.
Now it’s time to edit the data. Using the Replace command, remove all commas from the Client, Project, and Notes columns. You can replace them with a space, or some other character, such as a dash or a slash. Commas in the money columns don’t matter. If you look at the Date column, you will see both dates, and text designating totals, and distinguishing billed and unbilled hours. This violates the rule of having data of different KINDS in the same column. You can handle this in a couple of different ways. One is to ignore it. I think OfficeTime will just ignore those lines as well. OfficeTime calculates it’s own totals, based on the raw time and the rate you designate, so that line is unnecessary because the raw time data will import correctly, and the rates can be edited if they do not import correctly (but they should, so this should not be an issue.) A second way to handle the nonconforming data in the Date column (and the one I used) is to use the Sort command in Excel to sort by the Date column such that all of the rows with dates come first, and all of the rows with text are at the end. Then you can just delete the rows with text such as “Total:”, “Billed:”, and “Unbilled:”.
*Special Note: read the following paragraph and the one marked with the asterisk below completely before you start editing your data.
The next step of editing is to arrange the columns in the correct order. Here’s where you need your secret decoder ring. First, OfficeTime requires that the columns be in the following order, left to right: Project, Employee, Duration, Date, Category, Notes. InerTrak and OfficeTime speak different languages here. InerTrak “Clients” become “Projects” in OfficeTime. So the first thing you want to do is change the column title from “Client” to “Project”. You don’t have to do that the make the import work, but it’s helpful for the sake of tracking what you’ve done to the data. In your InerTrak data, there isn’t an “Employee” column. Insert a new column labelled “Employee” in Column B. OfficeTime allows you to track time by various employees, a capability InerTrak doesn’t duplicate the same way. For my purposes, I just typed my name into the first cell and used the Fill command to copy it into every cell in the column. You might also use your company name if you like. You can change it later in OfficeTime if you need to. The third column OfficeTime needs is the Duration data. This the the raw time you’ve expended on that item. Your InerTrak data should have this column labeled as “Hours”. Insert a new empty column in the third place, then copy or cut and paste the time data into the new third column. You can re-title this column “Duration” if you like. By now your date information should be in the fourth column where OfficeTime expects it. If it’s not, follow the same insert, copy steps to move it where it belongs. Category has to be the fifth column. In InerTrak this was called “Project” and should have been the second column. That should put the Notes column in the sixth column. The last column is the yes/no column for whether those hours have already been billed.
*If you did not start the column-swapping described in the prior paragraph with each column containing only the data of that kind, then by the time you finish this swapping operation, it will be hopelessly mangled. Before you start swapping, you need to scan your data carefully. If it’s not segregated properly, you must cut and paste, or manually insert blank cells to make sure all the client names are in the same column, all of the dates are in the same column, etc. A possible exception to this rule is that if you did not delete the rows containing totals & billed/unbilled, then that information will still be in the date column.
Once you have arranged the data in columns as described above, you need to give it a final once-over. Eliminate any remaining commas (except for those in columns containing dollar amounts). Examine your Category column carefully. (This was called Project in InerTrak.) Before you import this data into OfficeTime, you must already have these Categories listed in OfficeTime. Each category listed must appear in OfficeTime spelled and/or punctuated EXACTLY as it appears in your data in Excel. If there is unintended variation, then you should use Excel’s Replace command to create uniformity. Sorting the data with the Sort command by the Category column can help expose any unintended variations. Mistyped entries are likely to wind up in a single row distinctly different than the row right above or below, which can be very helpful for spotting them. If the import fails, missing or mistyped Category entries should be one of the places you look first for nonconforming data.
Step 3: Import into OfficeTime.
Before you import your data, you need to prepare your OfficeTime file to receive it. Manually enter each project and employee name into OfficeTime that it doesn’t already have before the import. In Inertrak, the project names were the old client names. Both project and employee names need to appear in OfficeTime spelled and/or punctuated EXACTLY as they appear in the raw data. You can’t have double spaces between words in the raw data and single spaces between the same words in OfficeTime. That will cause the import to fail because it will see a missing category. If you edited out commas from the InerTrak data in the Client/Project column carelessly, you can easily have missing or extra spaces between words. That’s why it’s necessary to enter data carefully and preferable to use the Replace command in Excel to make multiple changes of the same kind: you’re less likely to introduce typing errors that way. Invisible spaces after words can also trigger a fail. OfficeTime will see that as a different Client/Project name and abort the import in progress. Unfortunately, at this time OfficeTime has no mechanism for importing new project or employee names, and it doesn’t just add a new project or employee when it sees one it doesn’t already contain. Rather, it just aborts the import. Because you have to manually type in the new projects, it’s easy to introduce typos here. So, again, you have to enter and proofread this data very carefully.
(If your original data had commas in the Clients field, at this point you can see why you should have used the Replace command in Excel to remove the commas and replace them with some other character, or nothing at all prior to importing into OfficeTime. If you turned them into a space, then it’s possible that you have double spaces that are difficult to see. If you enter new projects into OfficeTime, but only use single spaces between the words when the raw data has double spaces, then the import will fail because of mismatched project names. You should either just remove the commas altogether, or turn them into a slash, or dash, or some other obvious character. If you use obviously different characters, they will be more easily perceived when you enter them into OfficeTime.)
OfficeTime has no mechanism for easily replacing the deleted commas if you want them in the final file. They will have to be restored one-by-one after the successful import, and this can be tedious. But OfficeTime cannot import the Project column if it contains commas. In your raw data, you will probably have the same Client/Project and Employee appearing multiple times. However, each project and employee only have to appear once in OfficeTime. Upon importing the data, OfficeTime will combine data in different rows with the same Client/Project name into one Project. It actually doesn’t matter what order the rows appear in in Excel at this point. However, for purposes of proofreading, it can be helpful to use Excel’s Sort command to return the data to alphabetically ordered rows based on the Project column. That way you can more readily spot any variations (however unlikely) in the project names before the import. The last step in Excel is to export the data in tab-separated form. Do this using the “Save As” command. In the “Save As” dialogue box, change the “Format:” option to “Tab Delimited Text (.txt). Give your file a new name and choose “Save”. Now you have a file ready to import into OfficeTime. (It can be useful to save various versions of the files in progress so you don’t have to repeat every intervening step from the beginning if you experience a problem at the final import.)
Start OfficeTime and—while holding down the Option key—choose the “Import File…” option from the File menu. That will bring up a hidden dialogue box that allows you to import properly prepared tab-separated text files. You might have to choose this option several times, as sometimes it brings up the regular Import dialogue box, even though you’re already holding down the Option key. This dialogue box contains instructions for editing your data into the proper format for the import. If you have followed the directions above, your data already conforms to these instructions. Press the “Choose File” option, then navigate to the file you saved as a tab-separated text file in Excel at the conclusion of your Excel editing operations. Once you’ve selected the file, choose “OK”. If you edited your data correctly, and your Project and Employee names match, the data will import with no problem. If the import operation fails, or concludes without importing your data, you have nonconforming data in the raw data or a mishandled step in the editing process. Re-open the tab-separated text file(s), cure the nonconformities, and try the import again.
Once you’ve imported the data, you might wish to review the billing rates for accuracy. However, each “Client” from your original InerTrak file should now appear as a “Project” in OfficeTime, and all of the time data for that client should appear with the new “Project”. Enjoy!
PS: Get your no-cost trial the desktop version of our Time Tracking Solution at OfficeTime.net
PPS: How do you use OfficeTime?
Downloadable Examples: